Hi!
This is my first attempt to make a CNC build. I have name it Yet Another Poor's Man CNC as I intent to build it with a really tight budget.
The idea is to make a 2 steps build:
I started this project some weeks ago, searching providers for the parts and making some designs. I have some Autocad files that will be published here soon.
- Step 1 will be to make a temporary functional CNC with as many of the final components as posible
- Step 2 will be to use the temporary CNC to rebuild some of the parts to substitute them with other material (and modify one of the axis in the process)
Finally my design has 10 structure pieces and the rest is mechanic parts and electronic.
DAY 1
With the wood part finally clear I went to a local shop to have the pieces cut from a 1200x600 mm piece. As I had received the day before the linear SBR12 rail and the 4 SBR12UU I decided to start the build.


It does not look so bad, so I will continue mounting parts as soon as the arrive.
DAY 2
While I wait for the rest of the parts to arrive, I had made a small rig to test the electronics.

I will be using a modified Arduino Uno R3 motherboard as a controller, called SBDUINO UNO R3. This version is made by one of the local providers of Arduino components(SBDUINO UNO R3 100% Compatible con Arduino). The modifications are:
This modified Arduino UNO will be using the SB CNC Shield Premium (Arduino SB CNC Shield Premium) the same people have developed. The main characteristics of this shield are:
- male pins for easier conections
- USB chip ch340g, with direct access to control signals (ideal for hacks)
- additional access to UART, SCL/SDA, 5v, 3v3
- mlue leds
The shield is using 4 DRV8825 with the following characteristics:
- 100% open hardware. The guys provide the schematics and all the files for it.
- 100% GRBL compatible
- MOLEX 15A conector
- easy duplication of axis to any other motor
- emergency button
- additional GRBL pins
- UART port for bluetooth control
- I2C connector
- and many more ...
- 32 microsteps
- from 8.2V to 45V motor input voltage
- overcurrent protection
- overheat protection
- and many more


The system will be using a Rapsberry PI 3b for visualization and controlling. Please note the raspberry PI will be using the Arduino UNO as the controller board.
The tests are promising ... G-Code is read by the Raspberry PI and send to the Arduino Uno without problems and the motors seem to do the work, so everything peachy at the moment.
DAY 3
Some of the materials have arrived today so I can continue doing some work.
All the axis will be screw driven, as it is easier for me to assemble.

This is a detail of the T-Nuts I'm using on the backside to hold the things in place. It is true is a particle board but the T-Nuts hold the components firmly.

Regrettably I'll have to wait for new couplers, as I made a measurement error. I thought the motors had a 6 mm diameter axis ... but they where 6.35 mm ... so the couplers I received do not match ... so $4 more to the budget and one week for receiving them.
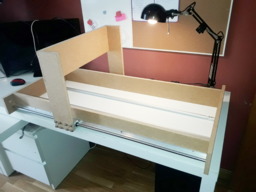
DAY 4
More materials available, so I decided to make a "conceptual" build to see if everything fits and works ...


Everything works nicely, but I will be making some modifications:
Additionally, if I started the project from zero I think I will use also SBR12 on all the axis, as it would have been less prone to flex and would have added rigidity to the whole thing.
- The central piece has to be cut by 5 ctms, more of less ... it seems it was cut with the wrong dimensions.
- I've to rethink about how to assemble some of the components ... probably a change of the kind of screws I'm using will do the trick.
- The X axis should be shortened, but I don´t want to cut the rods, so looking at the 1075 Sphinx design I think I will change 5 pieces to do so.
Keep tuned for more updates ....
YAPCNC (Yet Another Poor's Man CNC)
Build in 'Cartesian Style CNC' published by sergien, Jul 12, 2018.
Yet Another Poor's Man CNC (YAPCNC) is my first attempt to build a CNC. The idea is for the build to be as inexpensive as posible while being usable for my goals.
-
-
Build Author sergien, Find all builds by sergien
-
- Loading...
-
Build Details
- Build License:
-
- CC - Attribution - CC BY
-
Parts list
Qty Part Name Part Link Comments 1 120 x 60 DM wood Link bought & cut @ local store (16€) 2 SBR12 1000 mm Link bought @ EBAY with 4 SBR12UU 4 SBR12UU Link bought @ EBAY with 2 SBR12 4 NEMA 23 MOTOR Link bought @ ALIEXPRESS 1 POWER SUPPLY 12V 30A 360W Link bought @ ALIEXPRESS 1 SBDUINO UNO R3 Link ARDUINO COMPATIBLE BOAD MODIFIED FOR CNC APPLICATIONS ... bought @ STATICBOARDS 1 ARDUINO CNC SHIELD Link bought @ STATICBOARDS 4 DRIVER DRV8825 2.5A / 32 microsteps Link bought @ STATICBOARDS 4 FLEXIBLE SHAFT COUPLER Link bought @ ALIEXPRESS 8 SK8UU Link bought @ ALIEXPRESS 8 SC8UU Link bought @ ALIEXPRESS 3 T8 COPPER NUT Link bought @ ALIEXPRESS 1 T8 SCREW 300 mm Link bought @ ALIEXPRESS 1 T8 SCREW 500 mm Link bought @ ALIEXPRESS 1 T8 SCREW 1000 mm Link bought @ EBAY 2 T8 STEEL ROD 300 mm Link bought @ ALIEXPRESS 2 T8 STEEL ROD 500 mm Link bought @ ALIEXPRESS 3 T8 NUT CASING Link bought @ ALIEXPRESS