
Update 1/25/17
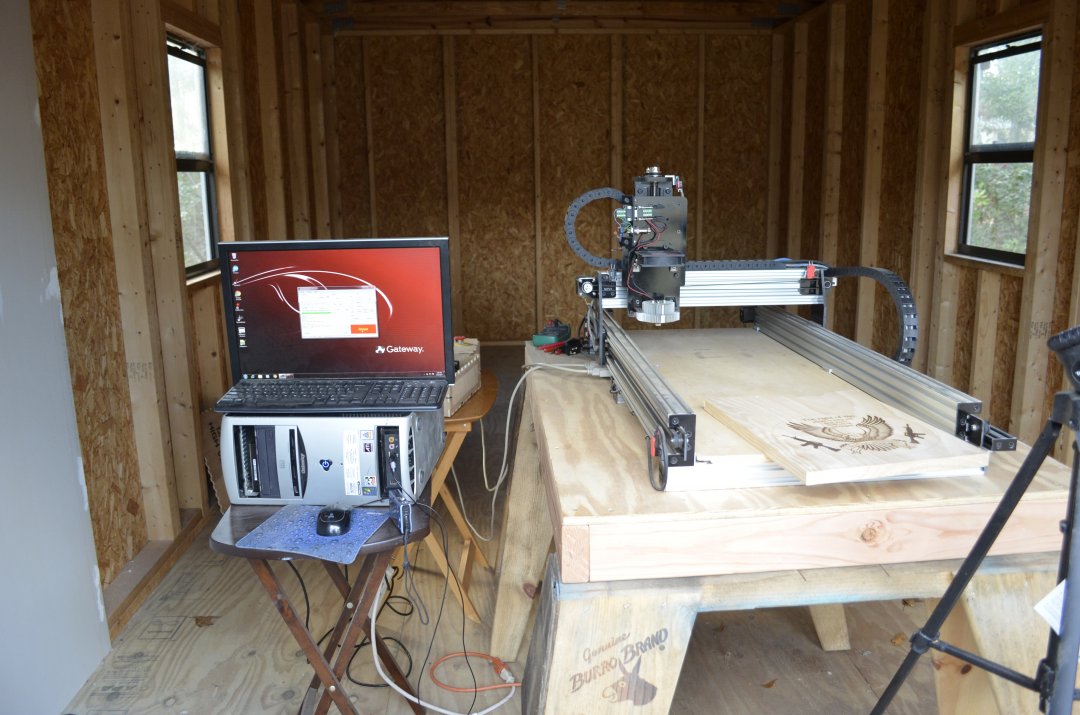
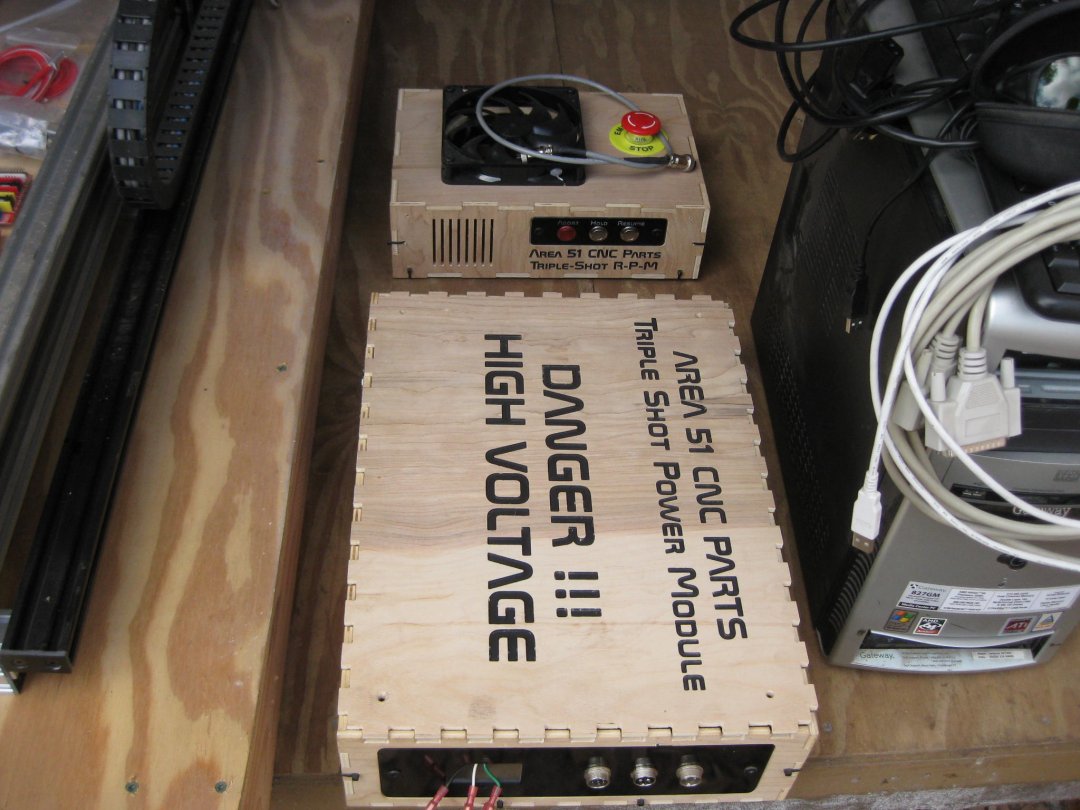
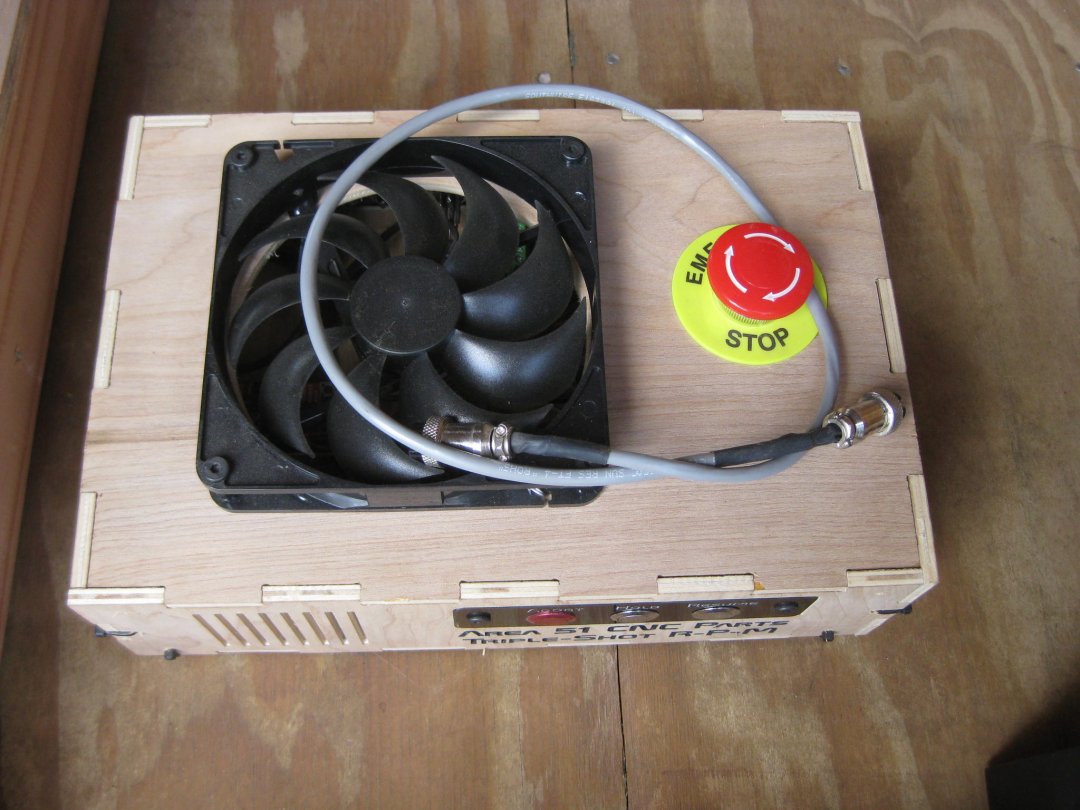
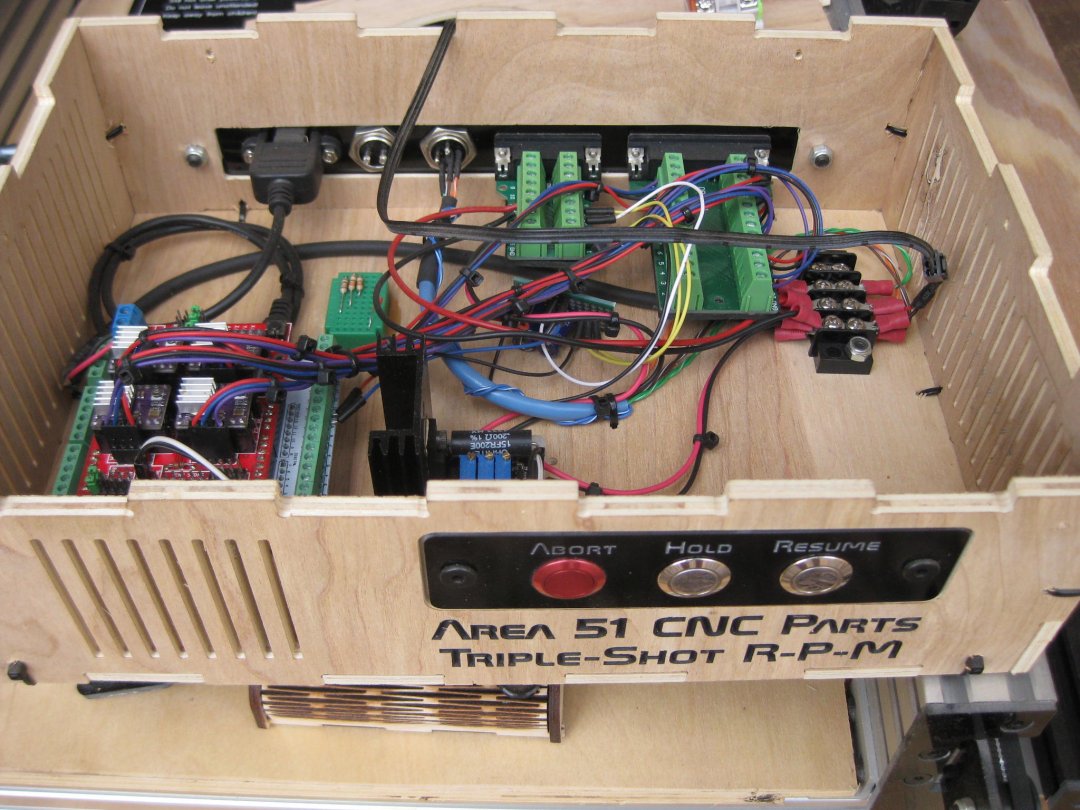
I just took the Triple Shot out of storage to reassemble it and give it a test. Everything works like a champ. See below for a short video and a couple photos:

UPDATE 1/18/17
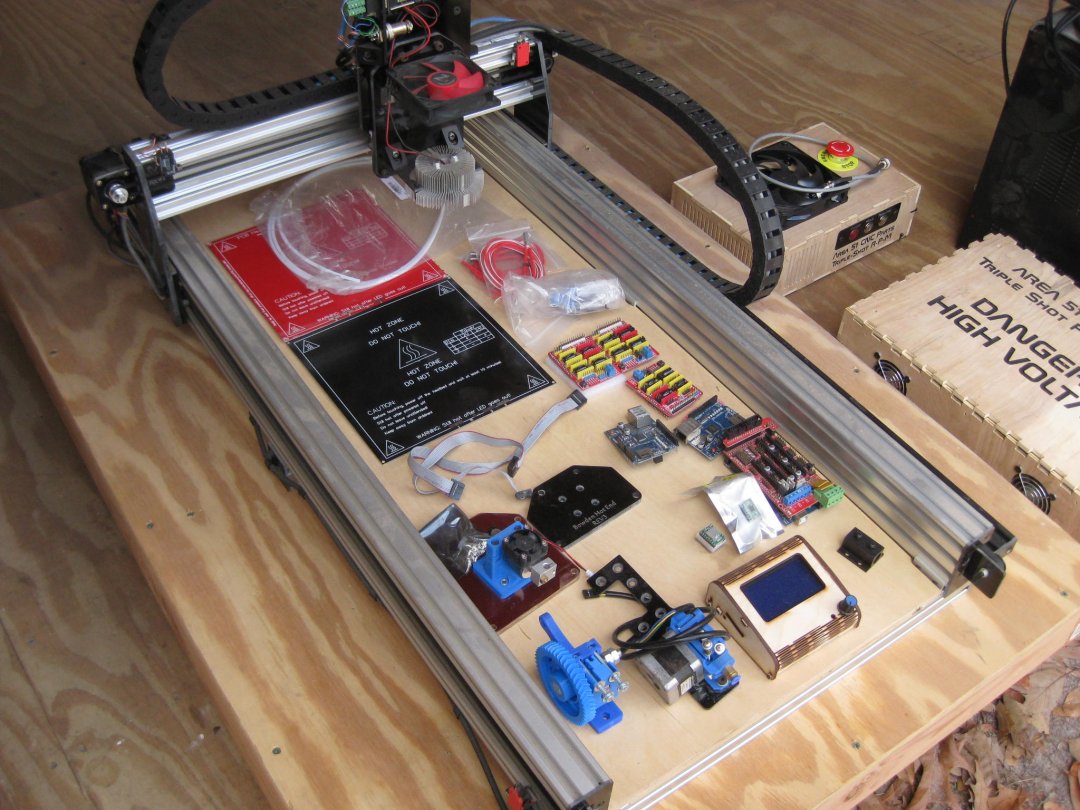
The Triple shot is now FOR SALE, everything still works just the way it did when I put it in storage. I have all the parts to add 3D printing functionality to it as well. Due to my business growing and the purchase of a new CO2 laser I no longer have a need for this one. I have over $1300.00 invested in parts and electronics, i'll take $800.00 for it. I'll even throw in the PC that runs it.
You can message me here on Openbuilds.
Gerald
UPDATE 1/19/17
Thanks everyone for all the interest in this machine.
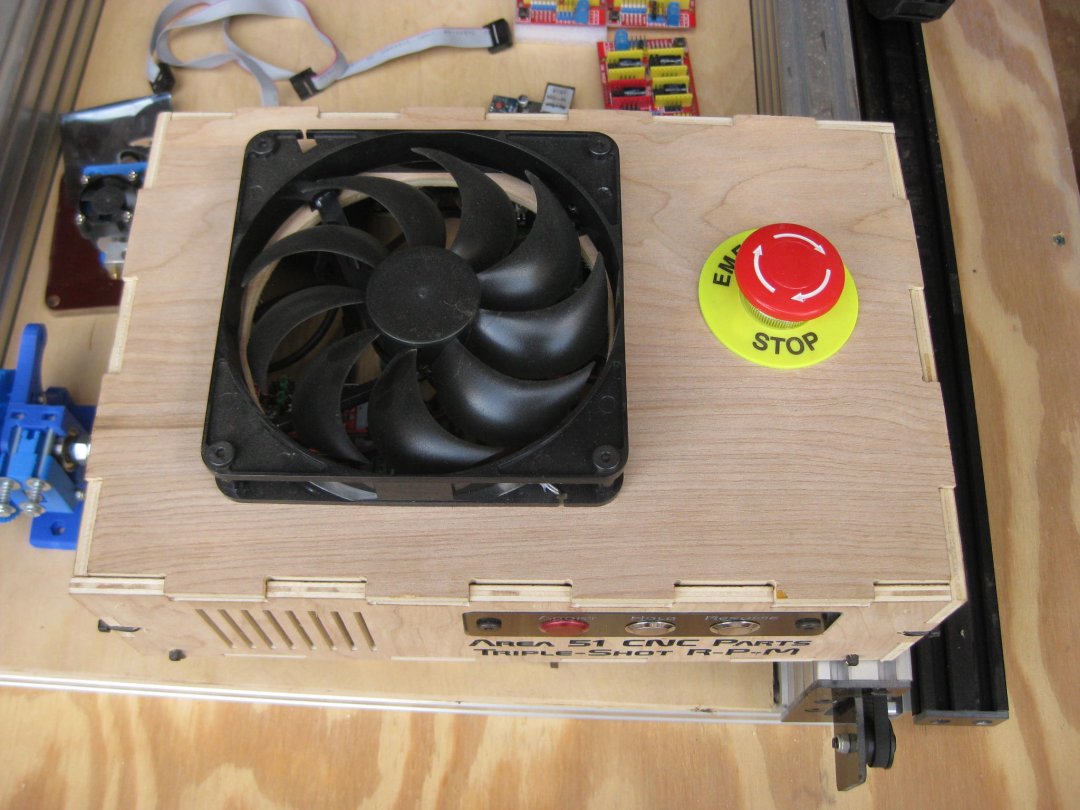
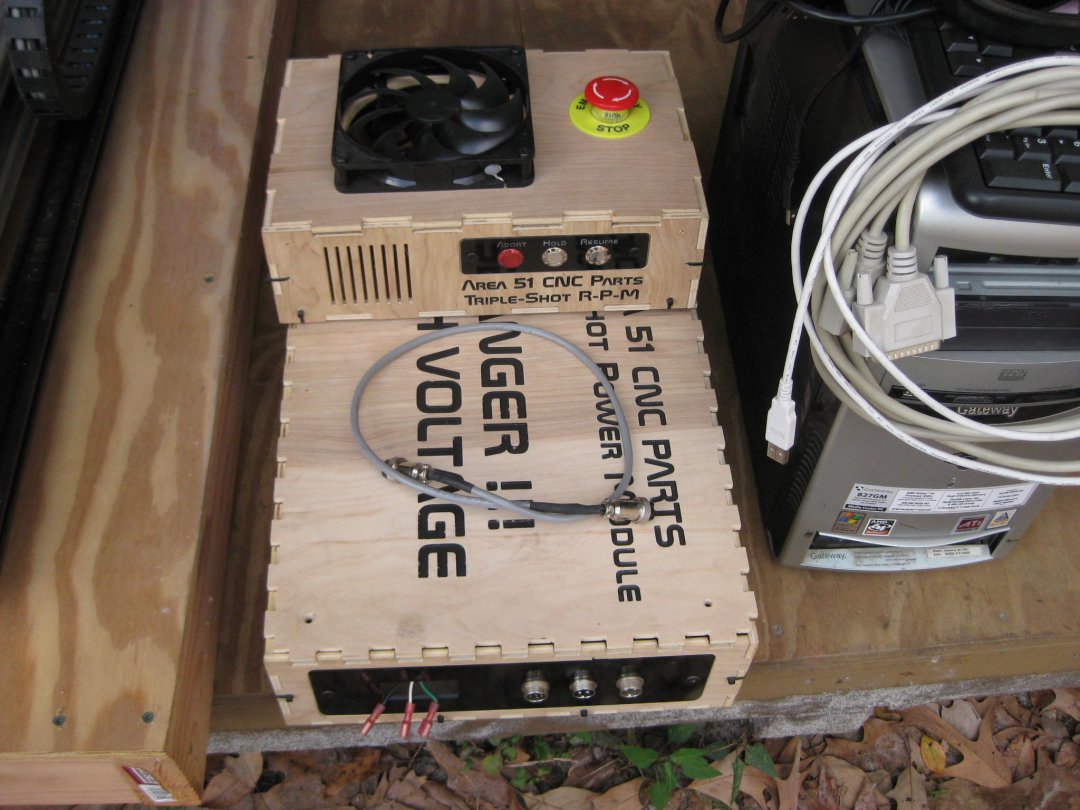
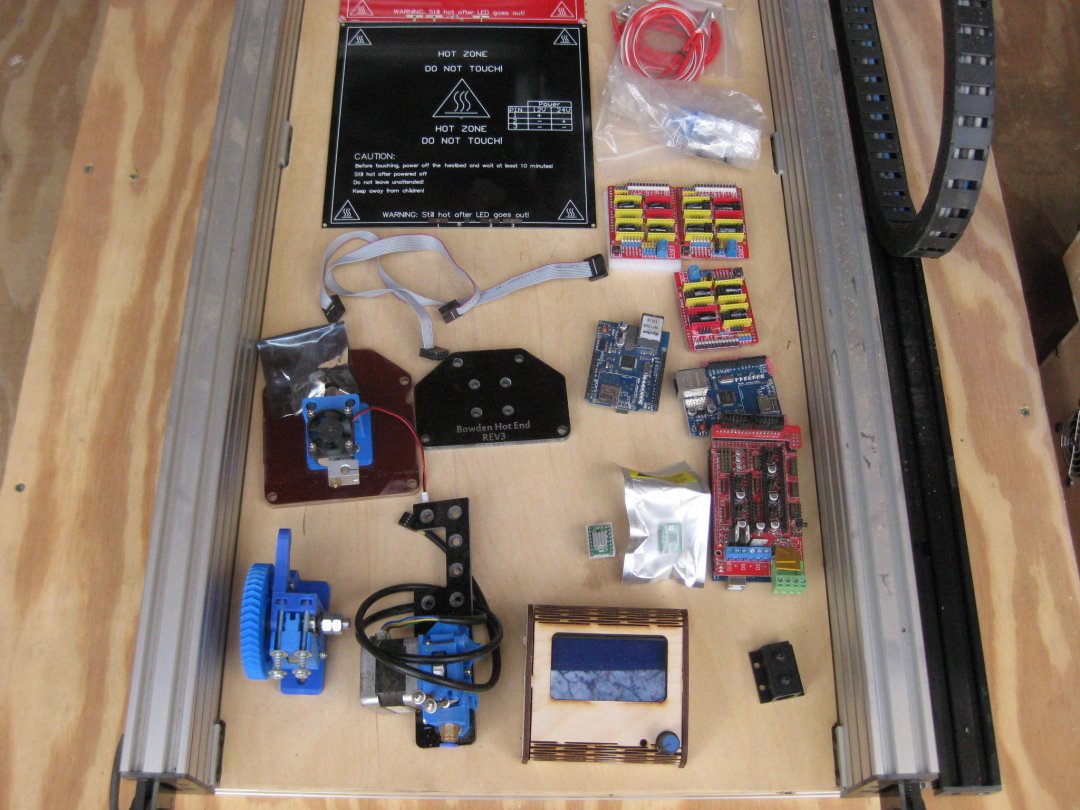
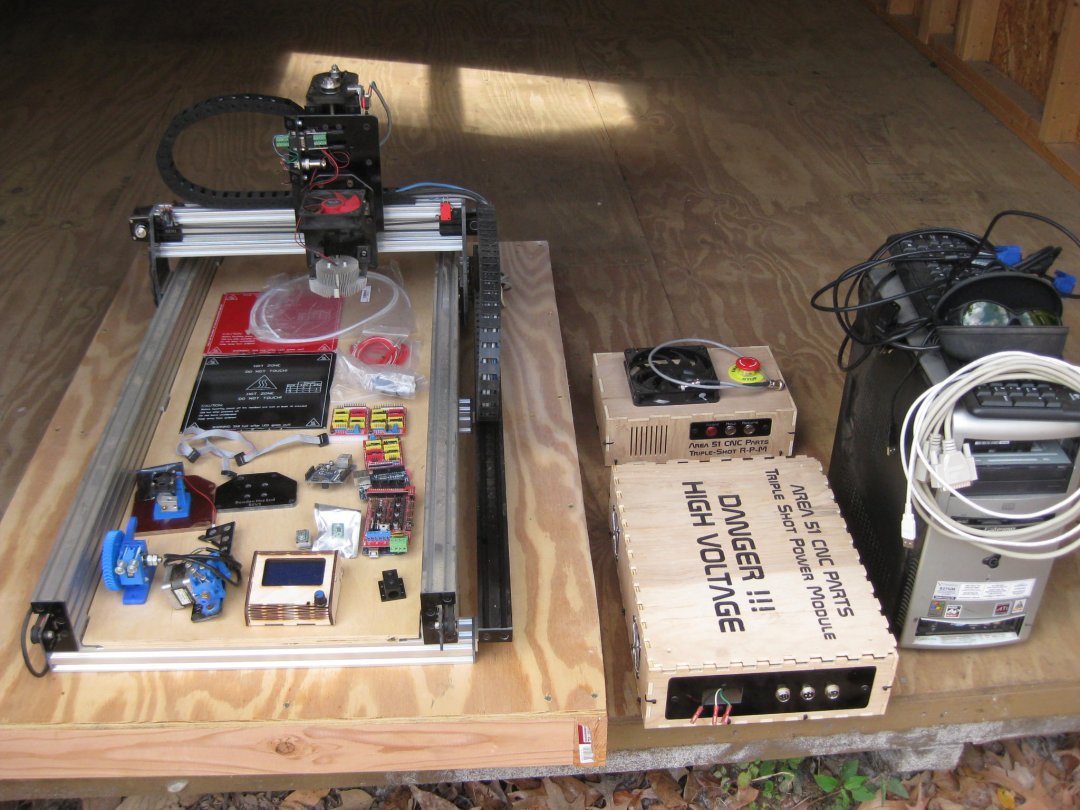
Due to a lot of requests I took new photos this morning of everything that's included. The only thing missing is the power switch (needed it for my other laser), but I have a replacement ordered and will replace it as soon as it comes in.
UPDATE 05/22/2016
Another long overdue update. The laser is still working great. I haven't changed a thing since the last update.
Due to a large spike in growth with our sign shop I have had to recently purchase a 60 watt CO2 laser so i'll be selling the Triple Shot as soon as I get the other setup and running. I would keep it and finished the 3D printer and CNC spindle addon but i'm short on space and would rather it goto someone who can use it. It's still working great, I am still using the 6 watt DTR laser and a Flexmod driver. This diode is currently under driven, i'm running it at about 4.5 watts, from what I understand that could be increased to about 5.5 with a different driver board.
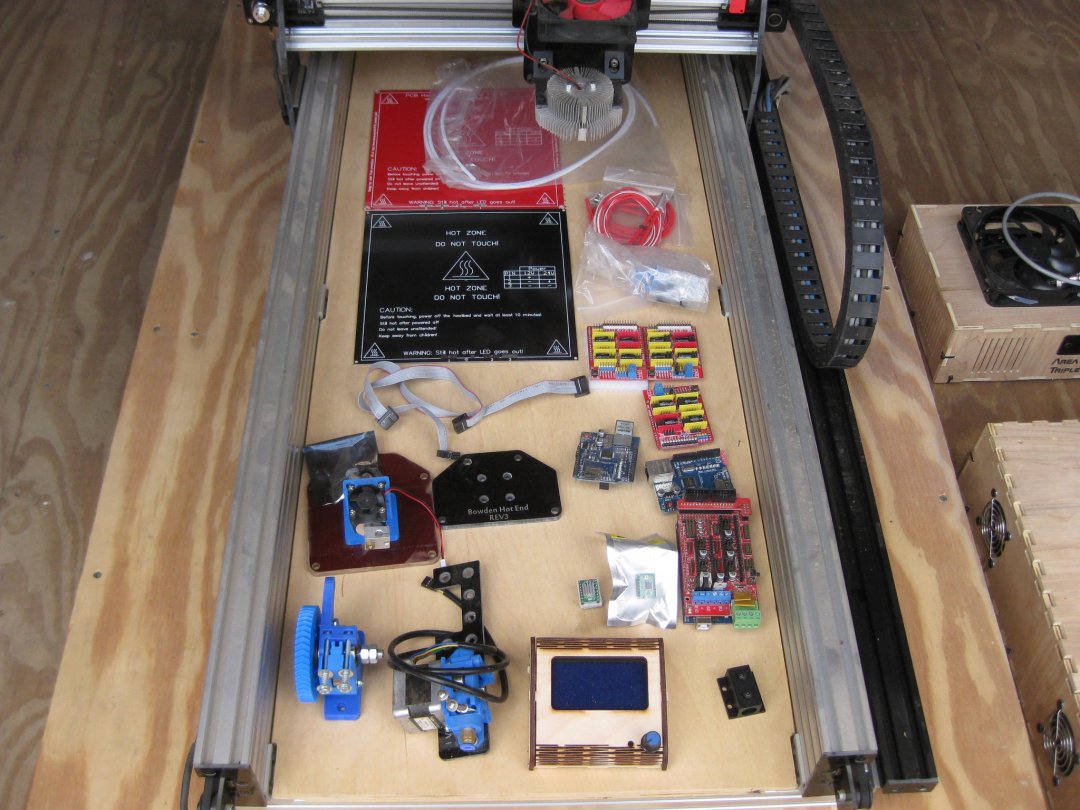
I have all the parts to finish the 3D printer add on as well, including RAMP 1.4 with LCD and drivers. Would make a great project for someone to finish and have a nice 3 in 1 machine...
UPDATE 10/14/2015
Long over due update. We have successfully tested the laser module portion of the Triple Shot. We were having some issues with EMF triggering false limit switch alarms but solved that with a RC filter on the limit inputs.
Now we are testing out different software combinations to see what works the best, balancing out freeware vs. paid options. So far we have tested the following for Grbl senders:
Universal Gcode Sender works ok but would sometimes choke on very large gcode files (the java based versions seem to do that) FREEWARE
3DPBurner Sender streams large gcode files well (1 million lines +), easy to install and run, multiple mode options for 3 axis mill, 2 axis laser_Z, 2 axis laser_S, and 3 axis laser FREEWARE
Grbl-Panel Works good so far, LOTS of options and easy to install and run, my only real issue is when loading gcode it seems to "buffer" it, not sure if this is the case or not but couldn't get a larger 500k line gcode file to load. Seems to be more oriented to the CNC router crowd or those just engraving vector files with a laser, grayscale engraving needs a different sender due to this. This will probably be my goto sender for everything except grayscale engraving. FREEWARE
Pic Sender would not work with my Uno board so I didn't get to test it, I'm running a clone board with the CH340 chip, when connecting the program errors out. All I can say is buy an official Arduino Uno if you decide to try this software, clone and other boards are not supported. $14.95
I will be trying other senders in the future and will update here when I do. I am also writing a blog post for the new website that will further break these programs down in more detail.
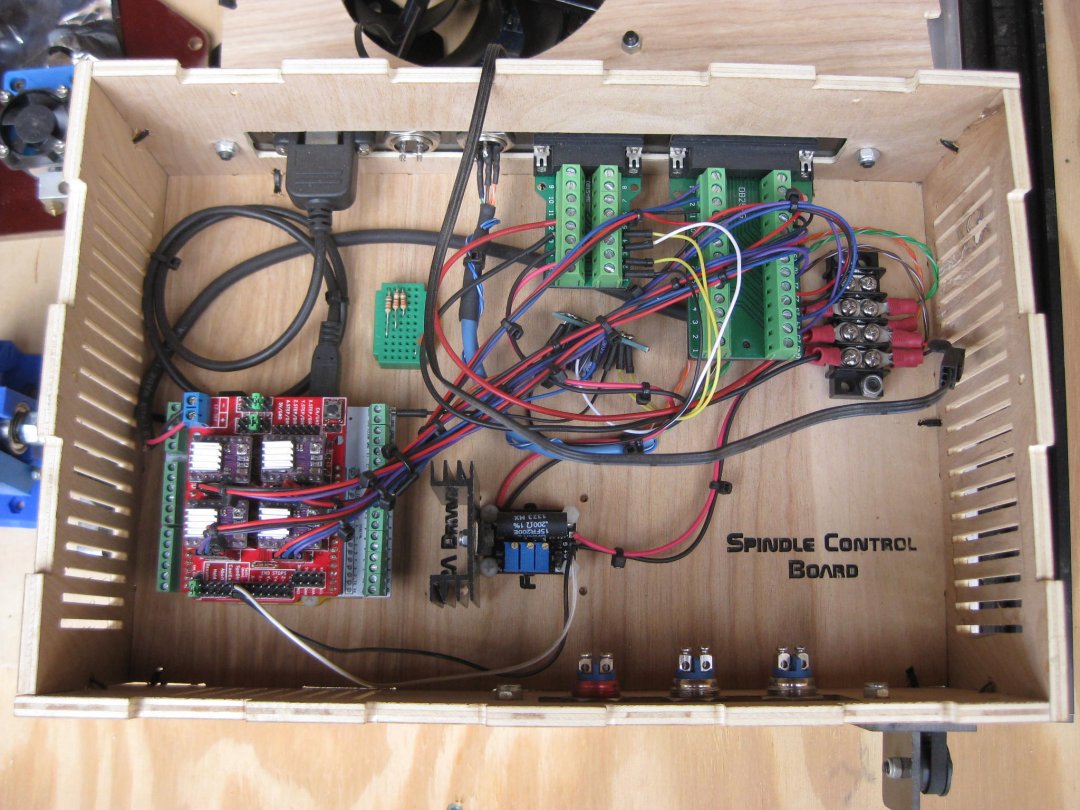
For control electronics we went with this package off Ebay: CNC V3 Shield for Mill Router Engraver + 4x DRV8825+ UNO R3 Arduino Compatible
I have since upgraded the CNC Shield to the latest version 3.10 to utilize the new pwm and Z limit output along with a couple other new features.
For motion control we have the yellow Uno R3 clone with a CNC Shield 3.10 and 4-DRV8825 drivers with a custom made RC circuit for the limit switches.
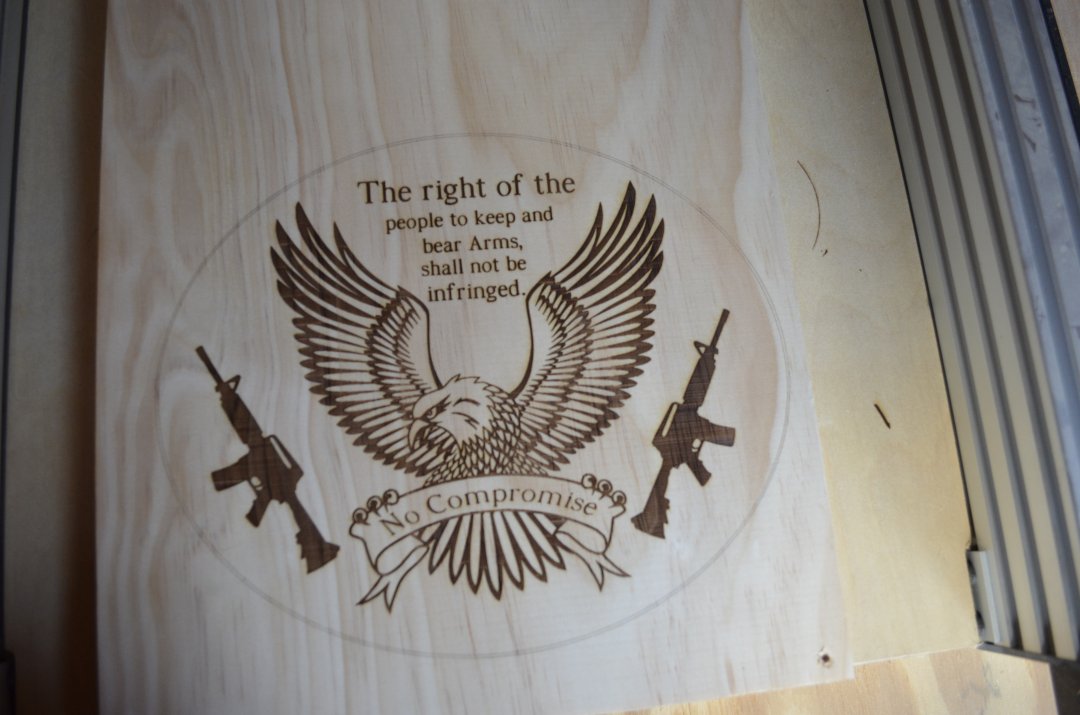
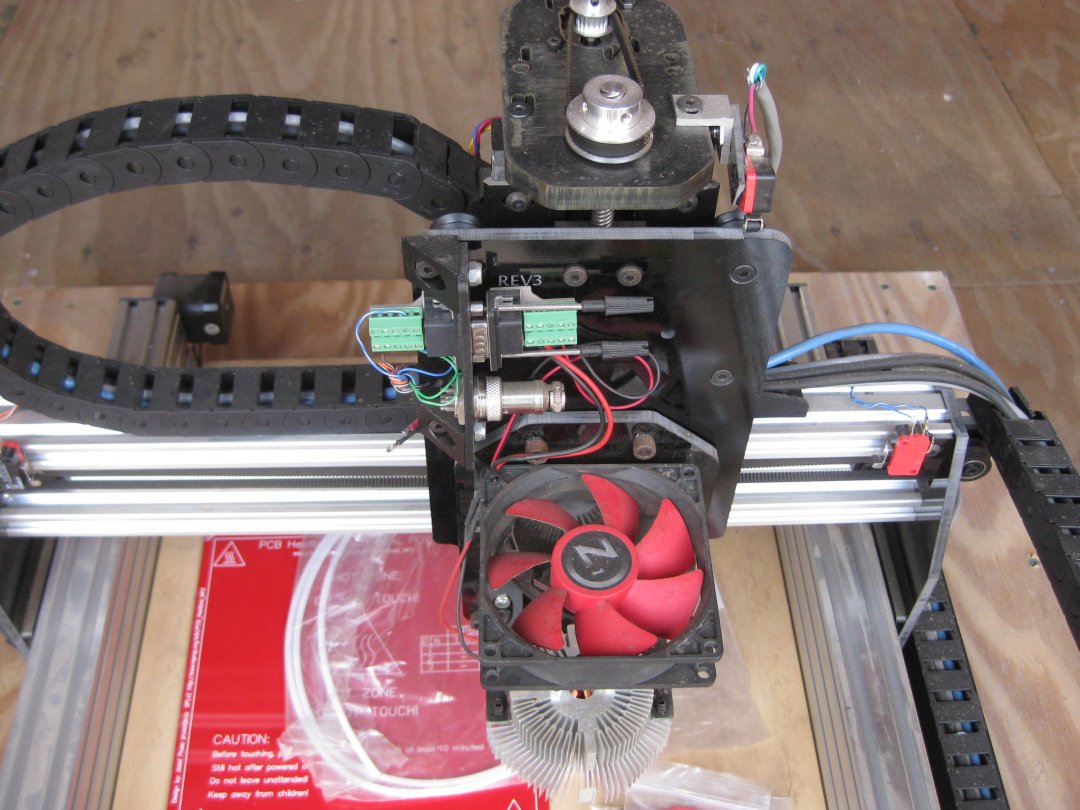
We have a 450nm 6 watt laser diode module from DTR with a Flexmod P3 driver. I have set the FlexMod for 4.2 amps output which seems to be working out well. Here are a few photos and videos of the machine in action:
![IMG_2091[1].JPG](https://openbuilds.com/attachments/img_2091-1-jpg.11581/)
![IMG_2092[1].JPG](https://openbuilds.com/attachments/img_2092-1-jpg.11582/)
![IMG_2093[1].JPG](https://openbuilds.com/attachments/img_2093-1-jpg.11583/)
![IMG_2094[1].JPG](https://openbuilds.com/attachments/img_2094-1-jpg.11584/)
UPDATE 08/26/2015
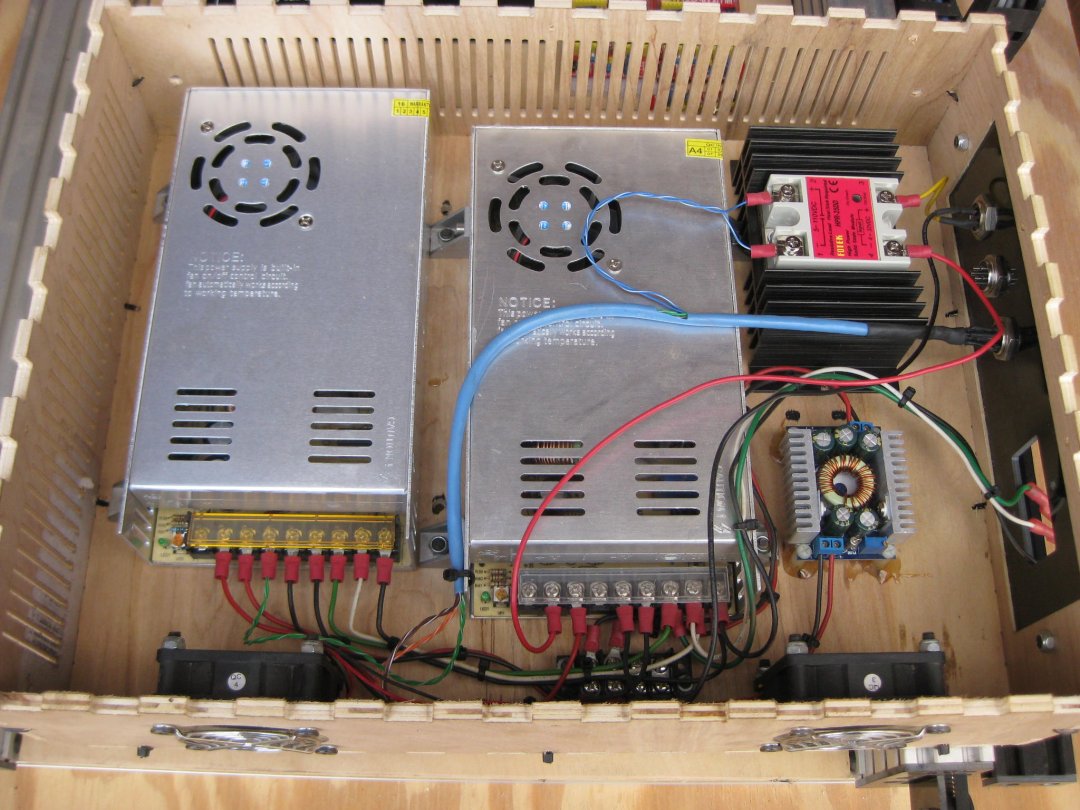
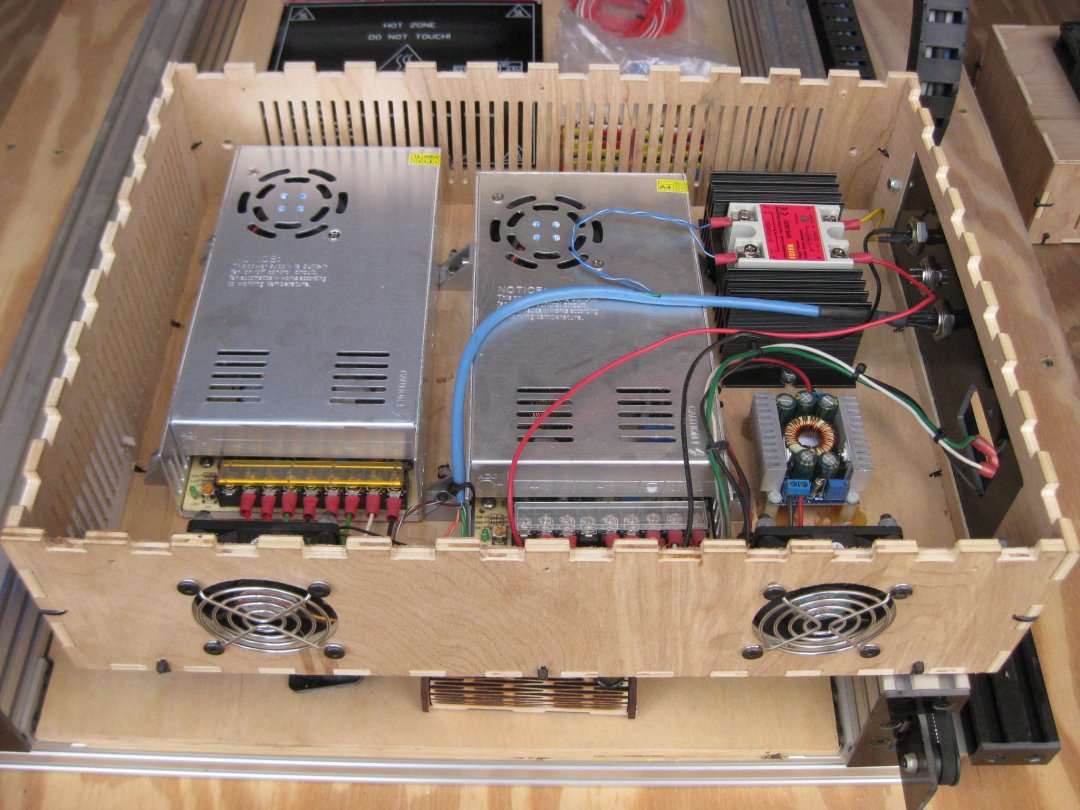
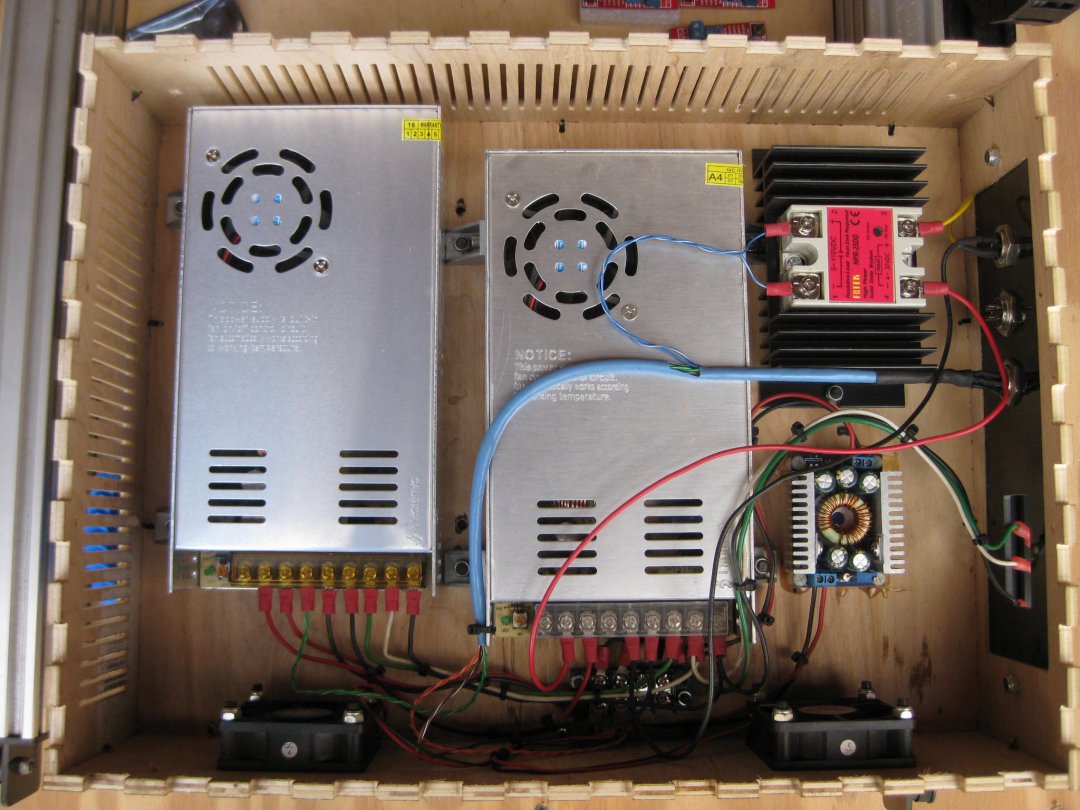
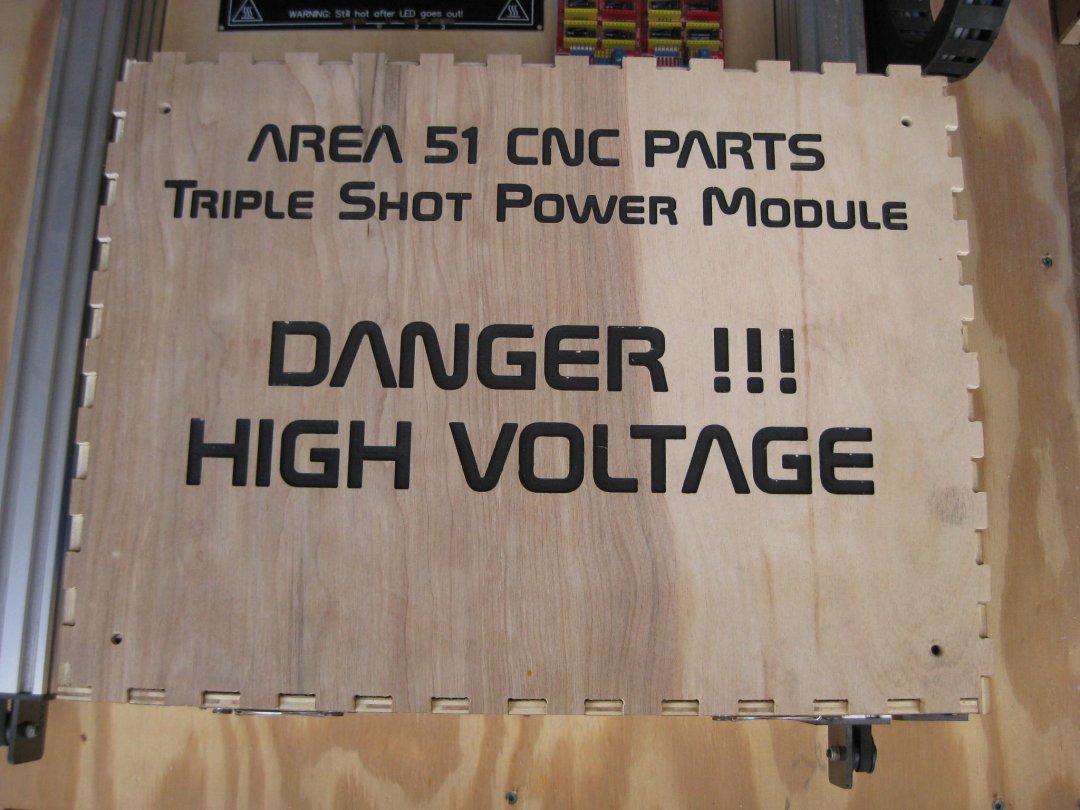
Ok i've completed the power supply module finally, it consists of 2 - 24V 15A switching power supplies tied together to double the available current (30A) for the 2 MK2 heatbeds we're installing for the 3D printer setup, 1 - 12V 10A adjustable step down buck drive to provide power to the fans and the laser driver, and 1 - DC-DC SSR to turn the heatbeds off and on. This power module will be able to provide the power for the Laser, 3D printer, and CNC router with all the associated electronics.
![IMG_0343[1].JPG](https://openbuilds.com/attachments/img_0343-1-jpg.10575/)
![IMG_0344[1].JPG](https://openbuilds.com/attachments/img_0344-1-jpg.10576/)
![IMG_0345[1].JPG](https://openbuilds.com/attachments/img_0345-1-jpg.10577/)
![IMG_0347[1].JPG](https://openbuilds.com/attachments/img_0347-1-jpg.10578/)
![IMG_0348[1].JPG](https://openbuilds.com/attachments/img_0348-1-jpg.10579/)
I have both a FlexMod P3 and a 6.2A adjustable driver for the 6W laser diode, and I just finished the custom heatsink host for this diode.
![IMG_0352[1].JPG](https://openbuilds.com/attachments/img_0352-1-jpg.10580/)
![IMG_0353[1].JPG](https://openbuilds.com/attachments/img_0353-1-jpg.10581/)
![IMG_0354[1].JPG](https://openbuilds.com/attachments/img_0354-1-jpg.10582/)
I am now working on the CNC Router/Laser electronics module and hope to have that completed this afternoon. I will upload some photos and a breakdown of the components here when I get it together. Stay tuned !!
UPDATE 08/15/2015
Alot going on right now, we're upgrading the laser to a 6 watt 450nm laser diode with a 3 element lens along with a analog/TTL driver capable of pushing out over 6 amps of power. We're going to keep it throttled down to 4.5 amps though to increase the diodes life span, should give us just over 6 watts of beam. I just received the driver, just waiting on the diode and heatsink now. The driver supports I.TTL/TTL/Analog triggering, it has a safety interlock feature and a thermistor to mount on the diode heatsink for overtemp protection.
![IMG_0340[1].JPG](https://openbuilds.com/attachments/img_0340-1-jpg.10360/)
![IMG_0341[1].JPG](https://openbuilds.com/attachments/img_0341-1-jpg.10361/)
We have decided to add on to my office/clean room to make a space for just the Triple Shot to occupy due to the inherent eye hazard of having such a high power diode on this machine, so development has somewhat slowed. I received my G10 today so i'm cutting the final plates and the connector plates for the electronics boxes, i'll post photos of those as soon as I get them assembled and tested.
UPDATE 7/31/2015
Getting closer to having the laser portion completed. Finally finished soldering the quick disconnect plugs for the different modules and Z slide. Replaced all the cheap limit switches with some that are more substantial. I just have a few small things to tweak then i'm cutting the final set of plates from a combination of .125/.25/.375 black G10 then disassemble the entire machine to do a complete BOM. I have decided to make a extended heat bed with 2-MK2 heat beds for a total print area of 8" x 16". Should work out great for those of us wanting to print out long parts like UAV arms and such. All the parts are in for the 3D printer, I just have to get the Ramps 1.4 board, extruder and, hot end hooked up, tested, and calibrated.
![IMG_0302[1].JPG](https://openbuilds.com/attachments/img_0302-1-jpg.10115/)
![IMG_0305[1].JPG](https://openbuilds.com/attachments/img_0305-1-jpg.10116/)
![IMG_0303[1].JPG](https://openbuilds.com/attachments/img_0303-1-jpg.10117/)
![IMG_0307[1].JPG](https://openbuilds.com/attachments/img_0307-1-jpg.10118/)
![IMG_0308[1].JPG](https://openbuilds.com/attachments/img_0308-1-jpg.10119/)
![IMG_0310[1].JPG](https://openbuilds.com/attachments/img_0310-1-jpg.10120/)
![IMG_0311[1].JPG](https://openbuilds.com/attachments/img_0311-1-jpg.10121/)
I'm going to try engraving this image again but on something without such a prominent grain... Anyway stay tuned for more updates !!
UPDATE 7/26/2015
We finished testing and tweaking the firmware and testing out some great opensource 3D image and Gcode sender software, so far everything is working great !! We engraved a photo of Drew Barrymore that took just over 4 hours and the sender software never skipped a beat. Here's a short video of the laser working that engraving.
We are running a modded version of Grbl with a CNC shield 3.0 with some drv8825 drivers. Couldn't be happier with the progress of this machine.
We will be completing the installation and testing of the 3D module soon so stay tuned !!
UPDATE 7/5/2015
Just finished up the 2 watt laser mount with a 24v 80mm fan for cooling and clearing smoke. The laser is mounted on a SSR heatsink with thermal compound. Shouldn't have any trouble keeping the diode cool.. Here's a couple photos of the new mount.
![IMG_0273[1].JPG](https://openbuilds.com/attachments/img_0273-1-jpg.9767/)
![IMG_0275[1].JPG](https://openbuilds.com/attachments/img_0275-1-jpg.9768/)
Waiting on the mount for the E3d V6 hotend and extruders now, gotta love USPS, sent from Trenton NJ went to Jacksonville FL sorting facility 60 miles from me, but then took a detour to Cleveland OH, now apparently heading back to Jax then me... Seen that commercial yet "What do you think of when you think of the United States Postal Service"?
UPDATE 7/5/2015
Received most of my parts now. Redesigned the G10 plates alittle and redesigned the Y plates based on some changes to the belt clamp for the C beam gantry plates.
I couldn't find or piece together what I needed to terminate the belt inside the tight confines of the gantry plate so I designed one. I happened to have a old bamboo cutting board laying about, so I surfaced it to the required thickness and cut the new clamps from it. They came out nice and strong.
![IMG_0241[1].JPG](https://openbuilds.com/attachments/img_0241-1-jpg.9731/)
![IMG_0242[1].JPG](https://openbuilds.com/attachments/img_0242-1-jpg.9732/)
![IMG_0244[1].JPG](https://openbuilds.com/attachments/img_0244-1-jpg.9733/)
![IMG_0245[1].JPG](https://openbuilds.com/attachments/img_0245-1-jpg.9757/)
![IMG_0248[1].JPG](https://openbuilds.com/attachments/img_0248-1-jpg.9758/)
![IMG_0249[1].JPG](https://openbuilds.com/attachments/img_0249-1-jpg.9759/)
And here's my new favorite tool for tapping those M5 holes.
![IMG_0253[1].JPG](https://openbuilds.com/attachments/img_0253-1-jpg.9760/)
Works great for tapping, just add a little WD40 and go to town.... Not the cheapest tool @ 14.o0 on Amazon but well worth it in my book...
We settled on a bowden extruder setup for this machine. I'm going with a E3D V6 hotend and either a Wade extruder or Airtripper, I ordered both to try out with this machine... We're also going to use a aluminum 24V heatbed.
I'm trying to find or custom write some firmware to run a combination of Arduino electronics, we're working on using a Mega 2650 and Ramps 1.4 with drv8825 drivers. I would like to modify Marlin to run at least the laser and 3D printer without having to re-upload different firmware each time. I have a working Uno/CNC Shield 3.0 setup with drv8825 drivers now using some firmware modded for laser and CNC. If I have to for the moment i'll make electronic boxes that just plug in with the needed hardware and firmware for whatever is being used at the moment ie; 3D printer, laser, etc....
The Y and X mechanics are assembled for the most part, one of the Y belts was 2 inches short so we're waiting on some more belt as well as the delrin wheels for the Z slide...
Here are are few more photos of our progress:
![IMG_0257[1].JPG](https://openbuilds.com/attachments/img_0257-1-jpg.9761/)
![IMG_0258[1].JPG](https://openbuilds.com/attachments/img_0258-1-jpg.9762/)
![IMG_0260[1].JPG](https://openbuilds.com/attachments/img_0260-1-jpg.9763/)
![IMG_0264[1].JPG](https://openbuilds.com/attachments/img_0264-1-jpg.9764/)
Update 6/25/2015
Made some headway today, cut some stepper and idler plates from 1/8" black G10 and the Y plates from 1/4" black phenolic. Mounted part of the Z and ran the belt for the X axis. So far everything looks great, just waiting on parts now...
Here are some photos of the progress:
![IMG_0232[1].JPG](https://openbuilds.com/attachments/img_0232-1-jpg.9648/)
![IMG_0231[1].JPG](https://openbuilds.com/attachments/img_0231-1-jpg.9649/)
![IMG_0230[1].JPG](https://openbuilds.com/attachments/img_0230-1-jpg.9650/)
![IMG_0229[1].JPG](https://openbuilds.com/attachments/img_0229-1-jpg.9651/)
Our goal is to build a small format portable rapid prototype machine for the maker who desires a all in one machine. We will be using all "Off the shelf" readily available parts with the exception of the plates, no specialized software or hardware. Everything will be easily replaceable in case of a failure. This will be a cartesian gantry machine with quick change tool heads on the Z. We are trying to design this to be light enough to be portable and will have a "docking" station for it to rest on when doing a 3D print.
We will be starting off with a 2W laser/driver combo from JTechPhotonics. There will also be a 3D printer head with a heated bed and a 400 watt PWM spindle added when the mechanics are sorted out. The heated bed will remain on the "docking" station and not be portable.
The electronic will consist of a Arduino Uno running a CNC shield board with drv8825 drivers. A nema 23 stepper will drive the Y axis, a nema 17 stepper will run the X, and a nema 17 stepper will control the Z. The Laser will be capable of vector drawing, cutting some materials, and grayscale engraving photographs with opensource software. For 3D printing a Arduino Mega 2650 and Ramps 1.4 with drv8825 drivers and a full graphic display will be used, 3D printer software is still TBA, possibly Repetier Host and firmware. The electronics in 2 different enclosures, one for the Laser and router and one for the 3D printer with display. To swap from one to the other it will be a simple matter of plugging into a central connection and changing the tool to whatever one you wish to use. There will be a 12 and 24 volt power supply to run the electronics and motors. Our goal is to keep the electronics as affordable as possible while staying with opensource software solutions as well. We will be trying to incorporate the laser and cnc router control into the marlin firmware so the gcode can be run from a SD card in the future to make the machine even more portable.
This prototype machine will be using C-Beam for the X and Y axis belt driven. The Z will use a 8mm lead screw. The plates will be cut from black G10 and black XX phenolic. The cut/build area will be approx 15.5" x 35" with a Z of approx 4.5" - with spoilboard 5.5 for laser.
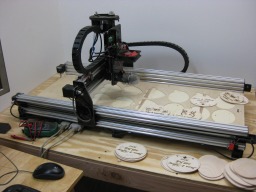
Triple Shot R-P-M Area 51 CNC Parts
Build in 'LASER - PLASMA BUILDS' published by Hytech2k, Jan 25, 2017.
We wanted to create a rapid prototyping machine with excellent 3D printing, laser cutting and engraving, and light CNC router work capabilities.
-
-
Build Author Hytech2k, Find all builds by Hytech2k
-
- Loading...
-
Build Details
- Build License:
-
- CC - Attribution NonCommercial - No Derivs - CC BY NC ND