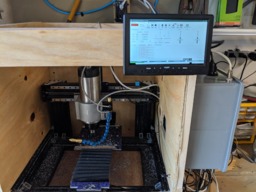
The build is rather straight forward. On the X, Y, and Z axis add the MGN-12 rails by drill and tapping holes 25mm spacing on center. you will need M3x45 cap screws. The 40x20mm U-Channel gets inset into the C-Beams, I drilled at tapped countersunk M3x45 cap screws to not interfere with the linear rails. The vertical support beam was replaced with 2 C-Beams with U-Channel installed as well. I created 3 adapter plates to direct mount via drilled and tapped for M6x45 cap screws. Also the lead screw nut has to be belt sanded down to fit within the now restricted space. Just sand or file to fit, the plastic is removed easily. The grub screws on the lead screw tops must also be sanded flush for clearance.Finally the 1x3in steel bars are welded then attached via countersunk M6 bolts, these bolts tie the Y axis to the steel. I am still waiting for my induction limit switches to arrive and for my bellows. I will update with those and a parts list at a later date.
A More Rigid C-Beam
Build in 'Cartesian Style CNC' published by OberSchutze, Aug 31, 2019.
I added the steel to create a less flexible milling surface to make heavier cuts in aluminum. I can also do light steel cutting now as well. I wish OpenBuilds made a steel and rail version of these kits.
-
-
Build Author OberSchutze, Find all builds by OberSchutze
-
- Loading...
-
Build Details
- Build License:
-
- CC - Attribution NonCommercial - CC BY NC
Reason for this Build
I rebuilt this with 150 pounds of additional steel to stop is from rattling and flexing. -
Attached Files: